Ever wondered how the professionals can make a vehicle look so much shinier than you can at home? Well, you’ll be pleased to hear that it’s not too difficult and usually just requires the correct products to be used in the right way. Our resident van cleaning geek, Mike, is here to talk you through his process in a few simple steps :)
“A few decades ago, when I was a lad, I had a small car cleaning operation going in my local village. I’d wash cars for a pound each and it generally involved a bucket, a sponge and some Fairy Liquid, sometimes I’d even Chamois it dry! Fast forward to today and I’ve learnt that there is a bit of science to cleaning and protecting your vehicle. But more importantly for me, there is a way to keep your vehicle looking great without wasting hours each weekend doing it.”
First up, you need to be using the correct products - and this is where I always rely on a British company called Bilt Hamber. These guys really know their stuff and have been consistently producing award winning car care products for years. I discovered them back in 2016 and have been singing their praises ever since. Their products are effective, environmentally friendly and concentrated, so a little goes a long way.
Buying, converting and owning a van can be a fairly expensive pastime so it’s always worth looking after your investment. Here is my ‘go to’ van care regime, which makes the most out of your time and your money.

4 step van wash routine
The following four steps describe my ‘regular wash’ routine. It takes about 40 minutes and I aim to do it every couple of weeks on average.
1. ALLOY WHEELS
The first step is to spray the alloys with Auto-wheel. This is a mythical solution that comes out colourless and quickly turns deep red as it works its magic.

Here’s a bit of particle science - every time you hit the brakes whilst driving, you are effectively shedding lots of hot, microscopic shards of brake dust and metal, which fly off and become embedded in the lacquered surface of your alloy wheels. Over time this builds up into that familiar dark staining that becomes harder and harder to shift.
Auto-wheel’s formulation reacts with the oxidising surface of these metallic particles, rendering it water soluble. The rapid removal of this microscopically rusted surface reduces the embedded particle size and releases the particles from the surface. Unlike acid based alloy wheel cleaners, this method is harmless to the wheel’s finish.
In the time it takes me to spray all four wheels, the first wheel is ready to be rinsed with the power washer. It’s that quick and simple - oh and I give under the wheel arches a blast at the same time.
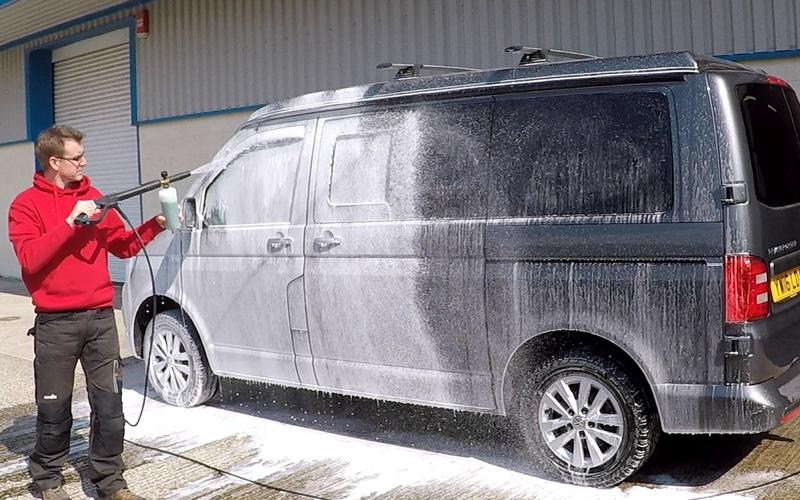
2. PREWASH
Probably the most overlooked, yet most important stage in car cleaning is the ‘hands off’ prewash. If you go straight at your dirty van with a sponge and soapy water you are effectively grinding whatever muck is on the surface into the paintwork and causing thousands of tiny scratches in the clear lacquer layer. It doesn’t take many of these washes before you’ve lost that smooth ‘easy to clean’ top layer and resigned yourself to duller paintwork and tougher cleaning for years ahead.
To avoid this, I always recommend investing in a pressure washer and a ‘Snow Foam’ lance attachment. It may seem like an expensive outlay but a decent one will last for years and save you time and money in the long run.
Bilt Hamber Auto-foam is a pre wash solution that turns into a foam when diluted and sprayed via a pressure washer. Spray it all over your van and allow it to ‘dwell’ for five minutes or so. This will break down any road traffic film, grease, mud and other gubbins that is stuck to your paintwork. Next, power rinse the whole van and you’ll be surprised how clean it looks already! So far you have probably removed 90% of the dirt from your van without laying a finger on it.

3. BUCKET WASH
You’re not done yet though. Fill a large bucket with warm water and add a tiny amount of Auto-wash vehicle shampoo. The manufacturer recommends about 5ml, which shows you how far this stuff will go. Now go ahead and wash your van in the traditional way using a good quality ‘wash mitt’. Start up high and work your way down. You may want to have a separate mitt for doing dirtier areas like wheels and sills.

4. RINSE AND DRY
Power rinse the whole vehicle again and give it a quick dry off with a large, good quality drying towel to prevent water marks. Your van should now be looking spectacular. However, if you want to take it to the next level… read on.
Van paintwork decontamination and protection
OK, so from here on I’m describing a process that you probably only need to do a few times a year depending on how many miles your van does and under what conditions. But I would say that decontaminating and protecting the paintwork makes your regular van washes a whole lot quicker and easier.
1. CLAY BAR
I must say I was slightly baffled when I first heard about ‘claying your car’… it sounded a bit counter intuitive, as though it might scratch the paint rather than improve it. However, having gone through the process a few times now, I can confirm it really works!
So, back to our particle science… similar to the tiny metal fragments embedding themselves into your alloy wheels, the same thing happens to the van paintwork. As we drive around, microscopic contaminants are constantly bombarding the bodywork and turning the smooth factory clear-coat layer into a rough surface. You can actually feel it just by lightly running your hand over the bonnet for example.
Bilt Hamber’s Clay-bar is a malleable square of clay that you rub lightly over your van and it ‘grabs’ all the contaminants out of the paint, resulting in a super smooth finish. In practice you would cut off a chunk of the bar, flatten it into a sort of pad and then use a water spray bottle to lubricate the ‘claying’ action. Working in small sections at a time, it’s not the quickest process in the world but you can see the clay discolouring as it does its job. It’s easy to feel the difference before and after.
2. WAX
Now to protect your beautifully smooth paintwork.
OK, let's start with the basics. There is ‘polish’ and there is ‘wax’ and they are not the same thing. The act of polishing means to use a super fine abrasive liquid to rub away a little of the surface layer in order to reduce blemishes. Whereas the act of ‘waxing’ means to apply a protective coating over your vehicle paintwork to protect it from the elements and make it look nice and glossy.
I’m not going to talk about polishing as that is more for owners of older vans and those who want to get more into vehicle ‘detailing’.
When it comes to wax, there are plenty out there to choose from, but for me the Double-speed Wax provides a great balance of glossy finish, lasting protection, speed of application and cost. It contains natural Carnauba wax, goes on quickly and buffs off easily.
And that’s it! My ‘quick and easy’ van care routine.

In an ideal world I’d probably do a ‘regular wash’ on my van every couple of weeks and a ‘clay bar and wax’ about twice a year. However, life gets in the way quite often so sometimes it doesn’t happen like that…
One of the biggest benefits I’ve discovered though is that by going through the process described above, each van wash becomes remarkably quick and easy. The dirt just doesn’t seem to stick so much when the paintwork is smooth and protected. So the whole thing becomes less of a chore, which means more time away in your van building adventures!
Happy van cleaning :)
Mike McCandless