 ]]>
]]>
]]>
]]>
The idea behind this exclusive product range is simply because we saw a real need in the marketplace for good quality, well designed, value for money products that will make your campervan experience easier, slicker and more enjoyable! A home away from home.
Mike and Rob McCandless, brothers and owners of Kiravans both have young families and are always on the lookout for ways to improve family time within their own campervans. They appreciate that family time in a campervan can be a struggle in terms of socialising, sleeping and that all important storage space. So... the ‘Designed by Kiravans’ campervan collection has been developed through genuine campervanning experience.
So, now's the time for you to grab a cuppa, take a well earned break and read all about our ‘Designed by Kiravans’ collection. We hope we can inspire you to enhance your campervan conversion with our collection of innovative conversion products....

The Kiravans Double Seat Swivel Base is an amazing piece of kit that will instantly create more space in your campervan and it’s easy to fit as well! Installing the swivel plate base can be done at home in a few simple steps.
Tens of thousands of happy customers across Europe have invested in our rattle-free van upgrade because…
With the double swivel, you get to keep your three seats in the front of your van, but in no time at all you can release and spin your front seats to face into the living area. Giving you plenty of space to spend time in and socialise.
Here’s what some of our customers have to say about it...

Available for both left and right hand drive vans, so perfect for UK and European vans and have been developed for VW, Citroen, Fiat, Ford, Mercedes, Mitsubishi, Nissan, Peugeot, Renault, Toyota and Vauxhall vans.
The Kiravans exclusive design-protected VW T5 T6 double seat swivel has passed all the requirements of TUV Deutschland. This involved 'in vehicle' pull testing and a SLED test over the water in Germany. In the UK it has passed seat belt anchorage safety tests conducted by STATUS (The Specialist Testing Facility at Manchester Met Uni) using a pull test on a specialist test rig to EC Directive 76/115/EEC as amended by 2005/41/EEC. Most importantly, it is the only T5 double swivel seat on the market today which has been crash tested to the current EC safety regulations, with full TUV safety approval.
Take a look at the Kiravans double seat swivel base in action.

Kiravans VW T5/T6 DoorStore (1st Edition)
The Kiravans VW T5 / T6 DoorStore was designed for the very reason that there had to be a way of gaining extra van storage without compromising on internal space!
Cleverly designed to maximise your campervan storage, it utilises the empty voids in your van doors and adds incredible extra storage for all your tools, refreshments and snacks, kids toys...whatever you want to use it for!
With three individual storage pockets than nestle into the door voids so you don’t use valuable living space and a wipe clean design so you can keep your campervan looking spick and span all year round.
What’s more it’s also super easy to install. Take a look at our DoorStore in action and see for yourself how easy to fit and useful it is.
You can even ‘bling up’ your door store as many of our customers have with lining carpet to match the rest of their interior. Check out our website for our full series of DoorStore ‘How to’ fitting videos.
Here are some of our customer photos so you can see the DoorStore in action…


We’ve also got storage for the back doors too with our exclusive Kiravans VW T5/T6 DoorStore (Rear Doors)


And, NEW in for Spring Summer 2022 is the Kiravans VW T5/T6 DoorStore (2nd Edition) and Kiravans VW T5/T6 PanelStore (2nd Edition), both in Black. A new and improved design featuring recessed panel fixing clip holes and smooth edges to form a neater OEM finish.

Kiravans VW T5/T6 DoorStore (2nd Edition)

Kiravans VW T5/T6 PanelStore (2nd Edition)
Launched back in 2021, our 'Designed by Kiravans' Ford Transit Custom DoorStore and Ford Transit Custom PanelStore was created for campervan and people carrier conversions. Giving extra valuable storage for those all important travel essentials and also for use in commercial vans, for tradesmen who want to have more storage in the back of their van

Kiravans Ford Transit Custom Black DoorStore (Left Sliding Door)


Kiravans Ford Transit Custom Black PanelStore (Right Fixed Panel)
The beauty of a Kiravans DoorStore is that it fits straight into the redundant sliding door cavities..simply remove the factory fitted hardboard panel in your van, pop in your DoorStore and you will gain loads more storage in a matter of minutes! Honestly, it’s that quick and easy to install!
The Kiravans Railsail was created as an upgrade to the more standard, rectangular van sun awning. Designed to give shade from the sun but also be able to withstand a downpour and a fair bit of wind...generally offering shelter from the typical UK weather! The asymmetric shape and curved edges allow for a variety of pitching options to suit different weather conditions. Along with everything we design, it stows away neatly and is quick and easy to put up using three telescopic poles.

Kiravans Railsail - Multi-pointed, Heavy-duty Campervan Awning


The Kiravans Barn Door Awning is an exclusive design and was the original one to hit the market. Created to be compatible with the VW T4 (with spoiler), VW T5/T6 (with or without spoiler) and Trafic/Vivaro (up to 2013).
We wanted to create a useful, weatherproof rear shelter to replicate the job that an up-and-over tailgate does. The reason being that many used vans come to market with twin rear doors as they are more convenient for trades people than a tailgate.
Our barn door awning can be put up in about 90 seconds and is 100% waterproof, keeps the sun off and can withstand very strong winds. Ideal for cooking out the back of your van, getting changed after an activity or just relaxing with a beer!


We've recently developed a VW T5 T6 Handbrake Lowering Kit that will stop your swivel seat base crashing into your handbrake when you rotate your seat.

We wanted to create something that was easy to fit and looked factory made. It’s produced in vacuum-formed plastic and includes all the nuts, bolts and cable protection you need to fit it in 10 minutes. If you've got a swivel seat, it's a great addition to your van.
It's also compatible with every single swivel on the market and our own exclusive ‘Designed by Kiravans’ Double Seat Swivel Base Plate.
Typically vans come with either no trim (which looks a bit naff), or an oversized piece of plastic that wraps up over the top of the OEM seat base and can cause problems when fitting a seat swivel. We figured it was time to turn our attention to making a tidy little plastic cover to go on the back of your seat base. We wanted to create a design that was fit for purpose and finished off the van nicely once your swivel is fitted.

It's compatible for both the driver and passenger side, UK and EU van models. Our panel is also removable and has the space for attaching electrical components like control panels, CBE accessories and the outlets for our MV Airo Diesel Heater fits nicely too!
Another problem solved!

The VW T5 T6 Under Seat Accessory Holder Brackets is a great under seat organiser, allowing you to affix accessories under your single driver or passenger seat without drilling into your seat base or floor! A brilliant accessory if you want to keep your van in mint OEM condition.
We’ve designed it so it’s compatible to hold battery chargers, fuse housings, cable management, and lots more.
If you want to secure your leisure battery under your driver’s seat then you need our VW T5/T6 Battery Clamp to hold your 12v battery in place using the batteries feet.
Our design works with lead acid, AGM or lithium batteries and means you can fit your battery standing up or lying on its side.


This piece of kit was designed to modernise and simplify the process of wiring up the 12 volt system in your campervan. Many of the other systems available on the market were either too complex for the small van owners’ needs, or were starting to look very dated. We wanted to design a good looking but competent control system that someone with no prior knowledge of 12v systems could easily get to grips with along with logical and simple installation. Hence, the Kiravans control panel was born with an uncomplicated control panel and an easy to identify fuse distribution board.


We devised the Certified RIB Seat Installation System Fitting Kit by Kiravans because we simply were not happy with the fact that customers could buy a fully crash tested RIB Seat and install it in a manner that may not be safe. We knew it had to be a simple yet robust installation system...one that had to be properly pull tested ‘in-vehicle’ to pass current safety legislation, easy to install at home and also be kind on the wallet too.
So our design engineer came up with a solution that ticked all those boxes and it has been used in thousands of safe seat installations to date :)

We created a comfortable and innovative Kids Campervan Bed, for VW T5/T6 vans. We knew it needed to be very quick and easy to put up and take down and be sleep friendly in a matter of minutes without any fuss...somewhere your child will love settling down in their very own happy, comfy, cosy and above all safe space. It’s also a storage friendly design that is a must when space in a campervan is limited!
We felt that existing portable beds relied on creating a ‘stretcher’ format using a combination of poles and canvas...this could be very frustrating and time consuming to put up every night after a busy day, and also a nuisance to store when space is really tight. This is where the idea of the Kiravans RedBed came from… a children’s campervan bed that was speedy and simple to install, would take up less valuable storage and would cleverly utilise the Kiravans Double Seat Swivel Base.


We want our customers to know that if they are hesitant about buying something from Kiravans, then you can have absolute peace of mind that you CAN return it, whatever the reason.
We strongly believe in our campervan products and that is why we recommend them to our customers...we only sell what we believe in! We are confident in our product range and we pride ourselves on offering a good returns service and stellar customer service experience, so don’t hesitate to put your trust in us.
We have a strong focus on the innovation of high quality, useful campervan conversion products and we are always developing our exclusive ‘Designed by Kiravans’ collection, as well as bringing you the best products from our preferred suppliers.
We've got a nifty VW T5 T6 Handbrake Lowering Kit that will stop your swivel seat base crashing into your handbrake when you rotate your seat.
As always we wanted to create something that was easy to fit, especially with the help of our ‘How to’ fitting video guide. It’s produced in vacuum-formed plastic to look factory made and includes all the nuts, bolts and cable protection you need to fit it in 10 minutes.
Even more great news… It's compatible with every single swivel on the market and our own exclusive ‘Designed by Kiravans’ Double Seat Swivel Base Plate.
If you want to secure your leisure battery under your driver’s seat then you need our VW T5/T6 Battery Clamp to hold your 12v battery in place using the batteries feet.
Our flexible design works with lead acid, AGM or lithium batteries and means you can fit your battery standing up or lying on its side.

It’s not about ‘out of sight out of mind’...we’ve thought about the organisation in your van from the van doors to under the seats.
Here’s a great pair of VW T5 T6 Under Seat Accessory Holder Brackets to allow you to mount accessories under your single driver or passenger seat without drilling into your seat base or floor! A brilliant accessory if you want to keep your van in original OEM condition.
We’ve designed it so it’s compatible to hold battery chargers, fuse housings, cable management, and lots more.

Typically VW T5 T6 vans come with either no trim (which looks a bit naff), or an oversized piece of plastic that wraps up over the top of the OEM seat base and can cause problems when fitting a seat swivel. We figured it was time to turn our attention to making a tidy little plastic cover to go on the back of your seat base. We wanted to create a design that was fit for purpose and finished off the van nicely once your swivel is fitted.
Compatible for both the driver and passenger side, UK and EU van models, our panel is also removable and has the space for attaching electrical components like control panels, CBE accessories and the outlets for our MV Airo Diesel Heater fits nicely too!
We’ve further extended our bonded tinted privacy window collection to include Premium Barn Door Windows Ford Transit Custom 2013+.
Our tempered windows are just the ticket for adding both privacy and style to your van conversion, as well as automatic window locks for a good level of security.
Don’t worry about window shipping either! We have designed our own extra strong packaging where the glass is suspended away from the box edges for extra protection when it’s out on the road. Not only that but we insure all of our glass anyway, just in case :)

Supersize your campervan storage power with our exclusive ‘’Designed by Kiravans’ DoorStore Collection. The DoorStore came from the simple idea of finding a way to gain extra van storage without compromising on internal space. It simply uses the redundant door cavities and has multiple, useful storage pockets.
We’ve been working really hard to keep up with the ongoing demands to fit the DoorStore in additional van types, so we’re excited to launch these new additions this Spring Summer!
The NEW 2nd Edition DoorStore and PanelStore for the VW T5 / T6 is now in black. A new and improved design with recessed holes for the fixing clips and smooth edges that curve into the panel for a neat OEM finish.
Drum roll please…. :)
Due to popular demand, our latest announcement is that we are soon to be launching the NEW VW T4 DoorStore (2nd Edition). It’s in production now and it’ll be live on the website as soon as it’s available.
Our precision cut VW T5/T6, Ford Transit Custom, Trafic, Vivaro and Talento campervan cab mats are a quick, simple and luxurious upgrade for your van.
We have different styles of cab, mid and cool little side step mats which will suit different types of seating options in your van.
We have cab mats suitable for both left and right hand drive and designs suitable to work with our Kiravans Double Seat Swivel, 1+2 fixed seats as well as 2 single seats. All perfectly cut to fit the cab and made from a quality, hard wearing carpet with some great features.
Our cab mats not only have great visual benefits but they are also good for added warmth, sound insulation, comfort and makes your campervan much easier to keep clean. Simply pop these in your van for an instant upgrade.
Over the years we have refined our campervan double swivel seat base design so we can confidently say that we are 100% confident in our product. Most recently we have launched our X82 Vivaro / Trafic / Talento / NV300 Double Passenger Seat Swivel.
Designed to easily transform and open up the living space in your van and easy enough for you to install at home in about 30 minutes!

Our 5 star reviews demonstrate how well engineered our rattle-free swivel bases are. We have to give the credit for that to our specialist manufacturers here in the UK - they really are top class and ensure top build quality. Working with only the best suppliers means that we can guarantee quality and safety is maintained.
Campervan lighting is a relatively cheap investment but can make a huge impact on the overall comfort and convenience of spending time in your campervan. Having ample light will help to reduce the feelings of living in a small, dark box!
We have added to our lighting collection including recessed and cone spotlights in a variety of colours, designs and finishes, which means you can have some real fun and be clever with your interior design.
All of our campervan lighting has been designed to fit smaller spaces, but will still give you the efficient lighting that you will need to effectively light up your campervan and make it a home away from home.


When the pooch refuses to wipe his paws when he jumps in the van, you can be sure to keep your van seats looking like new with our great new range of hand-tailored, waterproof campervan seat covers. These seat covers are extra strong, smart and designed to handle the toughest of campervan adventures.
Each seat cover is designed to perfectly fit a number of specific van models including the VW T5/T6 and Trafic (2014+), Vivaro (2014-2018) and Ford Transit Custom.
Remember, these also make a stand-out gift for that campervan lover in your life!
Our mission is to design and source better gear, to help you convert your van with greater ease, speed, convenience and confidence. And, that is why we’ve launched a new tool kit that has everything you need to help you insulate and carpet line your van. It’s the perfect add on if you’re buying one of our insulation and carpet lining bundles.
The Lining Kit Tool bundle will save you a job searching for and buying individual tools for this process and includes a Spear & Jackson Dual Blade Trimming Knife and Spear & Jackson Razorsharp Scissors. There’s also some additional knife blades thrown in as you’re sure to need them!

Whether you’re upgrading your existing conversion or creating a brand new campervan conversion from scratch, it’s vitally important that you do your research beforehand and find the right campervan converter to perform the work. We spoke to some experienced trade van converters and here are the points you should consider in order to make the right choice.
]]>
Photo credit @olive_and_oz
Converting a panel van into a campervan is one of the best investments you can make.
Whether you’re simply upgrading your existing conversion to add features like seat swivels, door storage or bathroom facilities, or creating a brand new campervan conversion from scratch, it’s vitally important that you do your research beforehand and find the right campervan converter to perform the work.
We spoke to some experienced trade van converters and here are the points you should consider in order to make the right choice.
Keeping these points in mind can really help you focus on what to look for when you’re meeting with converters and getting quotes for the work.
When researching the right campervan converter for you, it’s easy to become overwhelmed by the number of companies on the market.
As well as the van make, model and interior options, one of the most important decisions is choosing the right company to undertake your aftermarket campervan conversion build.
Think of it like building a house. You have a clear vision of what you want your conversion to look like, but selecting the right builder can be the difference between a good and a bad experience.
The average cost of a van conversion ranges from £500-£40,000. Up to £25,000 for a self build conversion and anywhere up to £40,000 for a professional conversion…gulp!
Of course, when considering a campervan conversion, it’s best to do as much as possible yourself if you’re on a budget, but outsourcing the conversion is often the simplest option if you have the money.
Undertaking a self build conversion will be no mean feat, but investing in quality products from the outset and following online ‘How to’ installation videos will enable you to convert your van with greater ease and confidence. What an achievement you will feel at the end of your conversion journey when you can finally go on adventures in your home away from home :)

Photo credit @retrofitted
It’s always best to meet with and get quotes from at least three van converters. The detail and scope of each quote can really tell you a lot about how they work and their process. It’s really important to make sure that each quote is ‘like-for-like’ and they include all products, materials, labour, any subcontractors and VAT etc. This is the only fair way to accurately compare quotes and see the true value of the work. If one quote is much cheaper than the others, it could be a sign that they want to win the work, but make sure they will not add on extra costs during the conversion process!
The cost and timeline of your conversion will of course depend on the scope of the job. If you’re looking for a design layout as well as the conversion, it will be considerably more than a simple product installation project. The cost will also change depending on whether or not you buy the products yourself or whether you can get the converter to buy the products on your behalf. In some cases, this can work out cheaper, as tradesmen are likely to have trade accounts and relationships with manufacturers, and can therefore pass on their trade discounts to you. This can minimise the risk of buying elements yourself, only to find they are substandard, or don’t fit your space. If you do choose to make the purchase yourself, it is important that you communicate with your converter to make sure they are familiar with the particular brand and comfortable with fitting the products you supply.
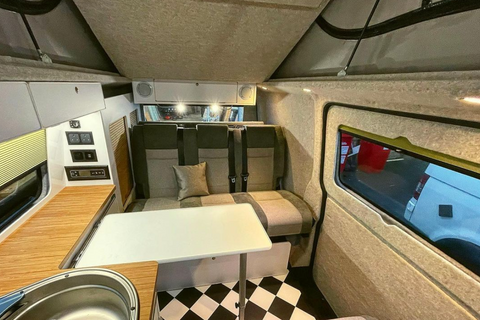
Photo credit @outandaboutcampers
Once you’ve chosen your van converter and after agreeing the price through a free, written quote, make sure you have a payment plan in place that you are comfortable with.
Different converters have different payment options, so best to choose a converter which suits your payment requirements.
Most converters will generally not ask for the total value of the conversion upfront, however, a deposit is commonplace. Usually, the final payment will be deferred until the build is complete, and some converters will even accept monthly payments.
An aftermarket campervan conversion takes a standard production vehicle (usually a panel van) and modifies it to become a campervan.

Photo credit @sunset.campers
There are many companies out there able to convert vans, but we understand that it can be very difficult for buyers to know what sort of reputation or experience these companies have, and what quality of conversion you can expect.
Due to the pandemic and a huge increase in the interest of campervans and motorhomes, Volkswagen Commercial Vehicles has recently launched a Motorhome Qualification Scheme which is designed to give buyers greater confidence in aftermarket, converted VW vans.
The new scheme aims to make sure that aftermarket conversions meet Volkswagen’s own exacting standards.
That’s not to say you should expect them to be built to quite the same level of quality as a factory built camper, but the scheme ensures converters that qualify have a number of things in place to support customers – including matching the warranty of the underlying Volkswagen van. Qualifying converters are required to meet stringent criteria set by VW and once the criteria is met they will receive ‘official certification’ from Volkswagen which they can use on their website.
Ford Transit campervans are also highly popular and the gold standard of quality for these conversions is the Ford QVM Certificate. This means that the converter is a Ford Qualified Vehicle Modifier.
Of course, there are also many converters out there who are not yet accredited to these new schemes, and it is not a reason to rule them out. We supply products to many reputable van converters including VW, Ford Transit and other van models, and we are proud to work with them.
You can also look for campervan converters that have won awards. For conversions, look for winners of the coveted Campervan of the Year award. Also look for those that have won business awards – it is a great indication that they are a professional outfit.
The difference between a good and bad converter is huge, so go with someone with experience, and lots of it! Asking for recommendations and advice on social media forums, researching website reviews as well as finding out local knowledge and word of mouth, will help to make your decision clearer.
A good converter will solve any problems you may encounter with your conversion and offer proper advice on what you need to do… and don’t need to do, depending on your requirements and budget.
The job of a good campervan converter is not just to deliver the campervan of your dreams, but to make the whole experience as enjoyable and stress free as possible! Reputation is essential and it’s always sensible to speak to ones who have performed similar jobs to the one you have planned. Ask to see their portfolio of their previous work and they should be more than happy to put you in touch with previous clients so you can discuss their experiences.
Check out their references and don’t be afraid to ask them questions as well.

Photo credit @motioncampervans
We always advise on a face to face meeting and it’s best to visit the workshop that will be carrying out your conversion. It’ll let you get a real feel for the set up, their capabilities, the team and will give you the opportunity to see how invested they are in their business and your campervan build.
A good campervan converter should actively encourage you to visit them and will want to show you around their premises and present to you the quality of their product samples and a tour of any camper conversions in build for other customers. This is an invaluable experience because it enables you to touch, feel and experience the products first hand. Pictures only tell half a story and, when making a significant investment in a campervan conversion, you want to be sure you have got the best quality for your budget.
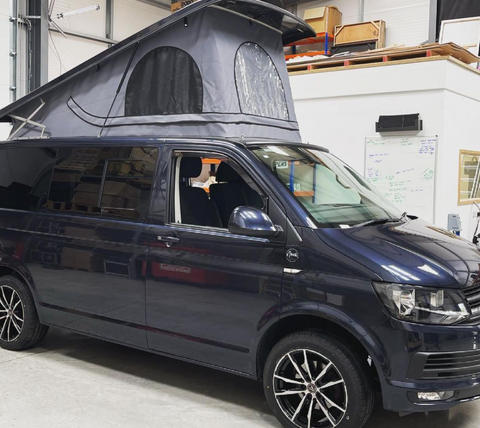
Photo credit @novacampers
With an expensive project like converting a campervan, make sure you know what warranty the converter offers before you commit. Most converters will give at least a year’s warranty and some even longer than this.
A warranty guarantee will give you peace of mind and most professional converters should naturally offer one as a testament to the quality of their work and commitment to their customers.
The converter’s warranty covers the work done by the conversion company. Exactly what’s covered may vary from company to company, so always check the small print. Is there an excess to pay for any repairs done under warranty? Are there any exceptions? Good questions to ask the conversion company.
Some products are expected to naturally deteriorate over time, such as window seals, so make sure you get a full breakdown of what is and isn’t included in the warranty.
Also, depending on the term of the warranty, the longer the warranty period the terms may differ, perhaps covering fewer elements or a higher excess.
Summing up all the points above, you need to look for the overall quality of the converter in as many aspects as you can. This encompasses everything from how they deal with your enquiry, their advice, their customer ratings, their premises, the quality of build you see in their campervan conversions and after build service.
We hope you found this guide useful but please drop us a line if you need any more advice.
Remember, there’s always the option of converting the van yourself. We have supplied conversion products to thousands of happy customers who give it a go themselves and swear by our useful ‘How to’ installation video guides :)

Hello, and welcome to our double seat swivel base buying guide.
Today, there are a number of different seat swivel designs to choose from and we appreciate how difficult it is for you to compare and choose the right option for you. So, for this very reason, we’ve put together some important information on how to choose the right double seat swivel for your campervan conversion, and how to get the most out of it once it’s fitted in your van.
First of all, you probably chose your van for its quality, durability and style. So, you probably also know that the long term value of your investment will only be maintained if you fit quality components…right?
Time and time again we see good vans being spoiled with cheap parts - it's such a shame! The saying ‘buy cheap, buy twice’ comes into effect here, but it’s not always about the price…it’s also about the quality and value for money you receive from the products you invest in.
Over the years we have refined our design so we can confidently say that we are 100% confident in our product. We are unique in the fact that we also manufacture some of the sub components for the swivel ourselves, including ultra tough fibreglass-filled plastic knobs and super strong stainless steel locking bolt shafts to avoid corrosion. We found that off-the-shelf parts simply weren’t up to the rigours of campervan life.
It's all about getting social and creating more usable living space in the back of your van.
With the double swivel, you get to keep your three seats in the front of your van, but in no time at all you can release and spin your front seats to face into the living area. Giving you plenty of space to spend time in and socialise.
Thousands of happy customers agree that this brilliant, rattle-free van upgrade offers superb quality and great functionality for comfort and ease of use, and really helps to open up the living space while retaining all the benefits of having three belted front seats.
The Kiravans VW T5/T6 Double Seat Swivel is fully safety tested, passing all the requirements of TUV Deutschland. This involved 'in vehicle' pull testing and a SLED test over the water in Germany.
In the UK it has been tested to EC Directive 76/115/EEC as amended by 2005/41/EEC. Our swivel base has passed seat belt anchorage safety tests conducted by STATUS (The Specialist Testing Facility at Manchester Met Uni) using a pull test on a specialist test rig to EC Directive 76/115/EEC as amended by 2005/41/EEC.
Our seat swivel base is design protected and only available to buy through Kiravans to ensure safety and quality is maintained.
It’s important to note that not all swivels are safety tested. If you see a cheaper design elsewhere that has been ‘inspired’ by our swivel, please be aware that it may not come with the necessary safety certification.
We are the designers, manufacturers and distributors - you’re not dealing with a third party so you cut out the middleman and be assured of our sound product and installation knowledge should you need any support.
Our exclusive ‘‘Designed by Kiravans’ Double Passenger Seat Swivel (RHD/LHD) is compatible with VW T4, VW T5/T6, Vivaro / Trafic (2001-2014), Ford Transit 3rd Gen (2006- 2013), Renault Trafic (3rd Generation 2014+), Vauxhall Vivaro (3rd Generation 2014+), Nissan NV300 (2014+) and Fiat Talento (2016-2019).
We've been making them for more than a decade and you've probably seen the phenomenal reviews our swivel gets from real customers. The truth is that we really believe this will be the best product you’ll invest in your van. Cheap copy products are a false economy that you'll regret later. When you buy a Kiravans swivel you will be increasing the value of your van and ensuring the safety of your passengers. Design matters, quality matters, and service matters. We think they are all worth a few quid extra!
There are now tens-of-thousands of campervans around the UK & Europe fitted with our Double Seat Swivel because they are…
Of course it depends on your own skill level to some degree, but honestly the swivel can be fitted by anyone. Check out our handy ‘How to’ video where we show you the steps. Typically we reckon it will take you about 30 minutes to fit the swivel.
When you’re ready to buy, we also have a multilingual fitting guide too.
If you have any questions what-so-ever about the fitting process please do give us a call we're very happy to talk you through it in person, on zoom, WhatsApp - anything to help really.
Time after time we get reviews from customers mentioning how well engineered our swivel is. We have to give the credit for that to our specialist manufacturers here in the UK - they really are very good. Laser cutters, multi-press folding machines, bespoke welding clamps & experienced welders all contribute to the excellent build quality. We only work with the best suppliers so we can guarantee quality is maintained.
Small things make all the difference between a product that is just 'made' and one that is 'designed'.
_____
_____


"Reassuringly Solid" - that's one of the most common things we hear from customers. And it matters.
We know you want to keep your loved ones safe. That's why we don't launch a product until we know it is up to the job.

You want to enjoy your campervan trips - they need to be a relaxing, hassle free experience. That's why we put the four safety bolts on the outside of your seat base. With this arrangement you can keep your essentials inside the seat base and you won't have to take them out every time you want to spin the seat around. That would be really annoying!
There is, of course, a 'nack' to spinning the seat around but with a couple of practice sessions you'll get the hang of it very quickly.
If you want to learn more about the operation and general maintenance of the Kiravans double seat swivel base then watch this video.

If you want to learn more about the operation and general maintenance of the Kiravans double seat swivel base then watch this video. Mike gives you a demo of our seat swivel and offers some useful hints and tips along the way. The double seat swivel is a game changer for adding more social space in your campervan conversion.
]]>
Video transcript
- Hey folks, welcome back to stage four in the lining process. So this is the exciting bit, this is where you get to stick the carpet lining on the inside of your van to make it look really good. So I'm going to do the normal format, bit of explanation and then a time lapse video of me carpet lining this van, and then we'll see what it looks like at the end.
So I've got 10 meters of stretch carpet here. I've already carpet lined my door store for the sliding door. I've carpet lined these four millimeter plywood panels, so they're ready to just screw straight on, one there, one each side here, one for the tailgate.
So I'm going to start off on this side and it's a very simple process. You get your high temperature adhesive, spray it on the metal work where you want the carpet to stick, spray it on the back of the carpet and then just press it on and you work it into the corners so that it molds to the metalwork. You probably go through quite a few Stanley blades so you'll need a few of those 'cause the carpet does blunt your knives. And some kind of little tool, hard tool to work into the corners is useful. And that's basically it, it's just going to take a bit of time. So we'll crack on and I'll show you how I get on.
So we're starting off by removing the rubber door seals from the back door and the side door. These just simply pull off. And then like all these sticking jobs, you want to make sure your metal work is nice and clean. So I'm using a degreasing agent to wipe it all down. Make sure there's no dust or any residue left on there.
Now a little bit of cardboard is handy here just to prevent any over-spray. Starting off at the top and spraying the metal work down to about halfway on this one. And we get our carpet and I'm just going to spray this top foot or so. And we're going to start hanging it like that. I've left a bit of extra carpet at high level so that you've got enough when you get to the back doorframe that when you try to patch it in, it's going to look okay.
Working around the window here. Not putting in too much detail at the minute 'cause I want to make sure the whole bit of carpet falls nice and flat. If you start too much detail in one corner without making sure the whole length is stuck at the top, you can end up with a nasty crease in it. Now I'm working around this window detail. You'll see I've cut an X just to release some pressure but always be careful not to cut too far at this stage, 'cause as you work into corners, that cut gets closer and closer to the corner and you don't want to leave yourself short of material. So I work that in there now.
Now going towards the back of the van and anytime I need a bit more glue, I just go under the carpet. Spray it onto the metalwork and spray it onto the back of the carpet. And just keep working like that. And you've got plenty of time with this glue, it doesn't matter if you spray an area and then leave it and go off and do another bit for five minutes. You can still come back and it'll still stick. And if you get a bit wrong, you get a wrinkle, you can pull it back off, spray some more glue on and have another go at it.
So I'm focusing on the wheel arch here. I haven't stepped on either side of the wheel arch, so there's still plenty of extra carpet to work with. And start in the middle, top of the wheel arch, work your way around, pushing in the details, working in with your little hard tool and your fingers. If you get any wrinkles, just pull gently down on the carpet, it'll stretch and it'll actually sort out any errors for you on its own. And then as you get into the real tight corner bits, you can put cuts in towards the corner. Again, don't go too close, but it will relieve some of the pressure on the carpet to let you work in those finer details.
So the wheel arch is done and now I'm going to finish the area in front of it. Just removing excess as I go. Just removing the excess from the front door pillar. Now remember, you're going to have your plastic trims to go back on here, so as long as you leave yourself 10 or 20 mil overlap, that'll tuck in behind your trim. And then same with the roof panels as well, leave yourself with extra up there.
Now working back around the rear-door pillar. Same process. You'll notice I've cut off the excess but I've left myself plenty to make sure I haven't left myself short. And then just work that round the corner. Stretching as we go. And I'm just using the back of pair of scissors here to work into the details. Just going to come along the floor, you don't need to go right along the floor. This far, I've got a full width threshold plate to go on here, which will cover that. And then just trim right down the edge of the metal work on the rear door pillar, and then when you put your rubber seal back on again, it'll be a really neat finish. So just finishing off in this corner here. And that is that side pretty much done.
Don't forget, I've got carpeted panels to go on here. So now I can remove the excess from behind them. I'm going to put some seat belts in here 'cause this is a Kombi van, so they're going to go in those middle of voids. And then if I take this excess material out of here, it'll let the airflow come through the panel to the slam vent, which is really useful when you want to shut the doors. And then it's basically repeat the process on the other side.
So I've speeded this up even more so we're not here all day watching this. But it's really nice to see the process from beginning to end so I'll let this run. It's quite a lot of extra material you can take out here. I think a chunk I take out from this sliding door area, I use to go across the top of the rear door towards the end of the video. Taking that extra off at the top there and then working again around the rear area and the wheel arch.
Now it is possible to do your wheel arches separately, but to be honest, it doesn't really make the job any easier, it just means you've got a few more cuts to match in. So if you can do it this way, I think you'll end up with a better result. And then obviously on the wheel arch on the passenger side, you've got the little raised up screw point where the jack gets located just here. So if you cut an eye section there, you should be able to tuck the carpet in underneath that and match it in quite neatly. And then just finishing off same on the rear door pillar here. And right down to floor level. And then get your rubber trims back on again, you may need your trim tool just to tuck in the carpet as you knock it on.
Now we've obviously got a section at high level here to finish off so I've made my two cuts equal distance from the corners on each side. Put a bit of masking tape just over the end of the carpet so that I don't get any spray glue on the actual carpet, but I can spray right up to the cut. Make sure my material is wide enough to get right across. Get some glue on that. Take off my masking tape. Put the carpet on.
Now this is obviously far too big so get it stuck on and then trim away any excess. And then actually matching in the cut is really just a, it's just a matter of being really careful, get a really sharp new Stanley blade. Just work slowly. Try and follow the line of the existing cut on the metal work and match it in as best you can. And if you take your time, you'll get a pretty good job here. Should you find that you make a mistake and you cut a bit too much off, you can cut a small patch and stick it in and it'll be almost invisible. And then just finishing off with the rubber door seal on the back door for a really neat finish. Now obviously at floor level, you can get a new full-width tread plate for the threshold which will cover up the ends of your carpet.
Now I just want to show you quickly carpet lining the panels. This is the door store getting carpet lined. There is a separate video available in the Kiravans site, showing a little bit more detail on how to do this. It's totally optional, you can put it in in the stock plastic or you can carpet line it.
And then this is the tailgate four-millimeter plywood panel. It's again very straightforward. This is just a quick overview of how it's done. And I've done this for all the other plywood panels on the van as well. And then it's simply a matter of screwing them in place. You've got the option here of using plastic clips or hidden clips, or what I've used is just steel screws, and they get lost really well in this light-coloured carpet. If you're using a darker carpet, you can get darker screws.
And for these rear panels here, just put a line in either side of that central rib. Put a little masking tape, mark either side and then you'll get your screws in the right place and then a nice neat row. And then finally get the door store popped back on with its panel clips.
Okay, that's the lining carpet done. This is a really good stage to get to in your van conversion. It's really rewarding to see it all come together. Time-wise, you probably want to give yourself a couple of days to do this job properly. Now there are two ways to do this. Obviously you can either put your wooden panels on first and then carpet line the whole thing, which gives you a slightly smoother look at the end of it, or you can do what I've done here and carpet line the panels and screw them on afterwards. This way gives you a little bit more flexibility if you're doing your van in stages and you want to come back later and put your wiring in for example.
Now in terms of how much carpet I used, this started off as a 10-meter-long roll. I think I used about three meters of length of that roll to carpet line these panels and the door store and the tailgate. And then that left me roughly, just a bit over three meters for each side. And then I used the chunk from the sliding door to do this section up here. So that's the 10 meters gone. Obviously, if you do the whole thing in a oner without doing these separately, you will have more carpet left over. You'll probably have enough left over to do the roof panels if you want to do those in the same colour.
Obviously, you can get new full-width threshold panel like this which is going to cover up both ends of the carpet and do a really neat finish. And if you got a barn door van, you can get a slightly different model but it will go that way across. And also you can get yourself a new step, which I'm going to do for this van because this is going to have a floor put in next which is going to raise it up slightly. I'm going to put back the original roof panels. And I've mentioned these slam vents.
So I've just left a couple of little holes in the back of these panels here which if all your doors are shut and you try and slam the tailgate, for example, the air that's trapped inside has got to go somewhere, otherwise the door doesn't really shut very well. So it'll go right through those. And I've left some spaces in this, in the insulation, and then the little slam vents are down in the bottom of the bumpers so the air can escape. So you can do that as well if you want.
Apart from that, that's this stage finished. I'm going to crack on with the floor next and we'll get this van finished as quick as we can. Alright, thanks for watching and I'll see you next time.
]]>We stock a range of privacy windows for the T5, T6, Vivaro, Trafic & Ford Transit Custom. Click here to view our collection
Our advice when fitting anything to your camper, is always that if you are in any doubt about your own ability to carry out all the steps, then it's a good idea to get a professional to complete the job for you.
Hello and welcome to this video in the Kiravans series of how to convert your campervan.
Today we're going to be looking at fitting van windows into our project van, which is a VW T6 short-wheel base.
First of all, we're going to go through a bit of an overview of how to do the job. Then we'll look at what tools you may require and also the materials that are going to be involved.
Now, like anything in campervan conversion, there are lots of opinions on how to do different things. What's the right way? What's the wrong way? We're just going to focus on the way we recommend fitting windows using the products available on the Kiravan's website. Let's have a quick look inside the van and get a general overview. Then we'll go through it in more detail.
Now, these windows are called bonded windows, because they basically get stuck onto the van. What we need to do is cut out a hole in the metal panel, leaving a couple of inches all the way around. It's not as bad as it sounds, because on the inside you've got an inner skin, which actually dictates the line that you cut, so you can't really go wrong.
Once you've got your hole cut, finish off your edges with a bit of trim. Then we put a bead of adhesive all the way around the hole. Then, it's simply a matter of grabbing the glass and sticking it on. Now, on the back of the glass you'll see this is the bit that you can actually see through, but on the outside there's a solid ceramic band and this is the bonding surface. It actually adheres to the van. Let's take a look inside now.
As you can see, inside the van here we've got the outer metal skin and basically the inner metal skin, or framework, that goes around it. This dictates our cutting line. We literally just follow this all the way around. Then we need to cut a nice straight cut across here, and up here, to take out that central strut as well.
Okay, now, the first stage is going to be cutting out holes for the windows. For this video I'm going to go through and use a range of different tools and give you some feedback on how I find each one performed. Hopefully, you'll have one or two of these at home that you can use. Just to go through quickly, a standard drill with a metal hole cutting set. It's quite a good way to do the corners, if you want to do that. A jigsaw is very useful for cutting out the bulk of the metal work. And a mini grinder, as well. Now, this one I've got a thin cutting disc on. I also used a slightly thicker grinding disc. Other tools, reciprocating saw, if you've got one of these, this can work. Also, going to try using the compressor tools. This is a little air saw and a nibbler. When I was converting vans for a living, this was the tool I used all the time. It's a set of power shears with a little oscillating blade. You probably don't want to go out and buy one of these, because I think they're over 200 quid.
I'll go through this range of tools and let you know how I got on. In terms of materials, obviously, you're going to need your Kiravans windows. Kiravans window fitting kit, which comes with some adhesive in it, some glass activator, some primer, some dabbers, and the little nozzle, and a pair of gloves, and some instructions in there. You're going to want extra adhesive for anymore windows that you're going to fit in. A range of hand tools, adhesive gun, a glass suction pad is really useful for when you want to offer the glass up to the van. Some face protection, some degreaser, some window cleaner, you're going to need some U-profile edge trim, and a few other hand tools. Let's get started with cutting the holes.
Now, before you cut any holes in your van, we really recommend that as soon as your windows arrive you unbox them to check for any damage. Take off the protective plastic wrapping. Get some window cleaning agent, give them a good clean on both sides. Give them a thorough check over. If there are any spots of adhesive on the glass, left over from when they put the sliding panels in, that can be removed with a degreasing agent. Then once you're completely satisfied with the glass, you can start cutting. If there are any problems, then Kiravans will certainly swap them over without any quibbles.
Once you're satisfied that your glass is in good condition, nice and clean, you can get on with protecting your van. We recommend getting a sheet of polythene, or something like that, taping it along the bottom to protect the paint work below where you're working. Then right around the corners, around the window openings, we also put a double layer of masking tape, just to be doubly sure that no exposed paint work will get scratched in the process.
Now, most cutting tools won't be very successful to get through the outer skin, and the central strut at the same time. So what I'm doing here is using a mini grinder. I've just marked a straight line along the top and the bottom. I'm cutting out the top inch, or two of that metal strut and the same along the bottom. That will enable our jigsaw to cut out the bulk of the metal panel without jumping. Once we've got rid of those two bits of metal, I'm just putting a dot in each corner, about 10 millimeters in from the corner, and with a drill bit, drilling through from the inside to the outside. Then go outside the van, and with a straight edge, just join up those dots with a permanent marker. This is going to mark our rectangle for cutting out with the jigsaw.
Get your safety kit on. I've stuck a handle in the middle, because I'm doing this on my own. You may well do it on your own as well, so it just means the panel is not going to fall in and scratch anything. As I cut, I'm cutting along, but I'm stopping about five millimeters short of each hole, so that the corners remain connected. Just take care that the base plate of your jigsaw doesn't scratch any exposed body work. Now, as I do my final cut, I'm going to cut right to the holes. Then trim off the last little bits in each corner and remove that panel.
Now, when it comes to cutting out the remaining inch, or two, of metal, you can use a jigsaw. It's quite tricky to get around the corners. I gave it a go here and was reasonably successful. You just have to take your time and keep looking inside the van and following that line of the inner skin of metal. Another option I tried was to use an air saw with a very fine blade. It's quite tricky to keep straight, but it did handle the corners very well. If you have a compressor, then that's another option. If you've got access to a hole saw and a drill, then this is quite a good way to do the corners. You can go right into the corner. It creates a nice curve for your cut and it means that you then just have to cut along the straight edges. For this one, I've left that central strut intact, because I'm going to use a fairly powerful reciprocating saw and that will cut through both skins of metal at one time. This is just another option.
With the tools at home, I'd probably recommend that you use a hole saw to do the corners, cut the top and bottom bits out with a grinder, and then use a jigsaw.
Using the air nibbler was reasonably successful and it did produce a nice smooth cut. It doesn't go in corners well, so I removed the corner material. But what I did find, once I cut out, was that it actually left three, or four, millimetres of metal all the way around, which I then had to get rid of. Finally, this is the power shears in action. As you can see, they produce a nice quick clean cut. Just be careful that any metal you trim off doesn't scratch the paint work of your van.
I've cut all the metal panels out of the side of the van where I want to fit the windows. We're left with a fairly sharp metal edge here. I've gone along with the angle grinder, taking off any high spots. Being careful where the sparks go and avoiding contact with the van. And then giving it a light rub with some sandpaper.
Next thing we've got to do is rust proof that edge, so that it doesn't start to corrode. To be honest, I've always used a bit of the primer with a little dabber. That just seals it all in, makes sure no corrosion is going to occur. Then after that, we grab some of our edge trim and knock that on before we actually stick the glass on.
When it comes to edge trim, there are a variety of different thicknesses you can get. At present we sell a thinner one and a thicker one. This is a thick one I'm putting on here. Now, historically, when I was fitting windows I would always use a Stanley Knife and cut out the rubber pinch wells between the two metal skins. Then re-bond the skins together and use the thin edge trim to hold them back together again. But, actually, a few converters have said, "Well why don't you just use the thick one, which will go over both skins as it is?" So that's what I've done here and it's worked really well.
Now we're ready to start prepping the vehicle for bonding.
Get some degreasing wipe and give it a really good clean around the paint work where the primer is going to go. Make sure you get rid of any polish or residue that's on there. Then give it a final wipe around with some glass activator. Give your little bottle of primer a good shake for 30 seconds to a minute, to get the little ball bearing moving. Then load up your cotton dabber. Now, we're just going to follow the line of the knock on trim all the way around the window, starting here. If you can do this in one continuous movement, it's recommended. Because they say if you start painting it on with forward and back strokes, you'll not get such a clean bed of primer on there for the adhesive. This has gone all the way around. When I get to the top corner, I'm going to go slightly outside where I first started, because that's where my glue/Winbond adhesive is going to create a waterproof seal, as you can see here. Same on the barn door windows.
Next, we are going to use the glass activator and give that a decent wipe all the way around on the ceramic band of the window. Now, this is a good time to dry fit your windows, just make sure there's no high spots in the frame that it's going to rock over. This rear quarter window is a little bit high in the middle, so I'm just going to take a rubber mallet and tap in the body work a bit. This will just make sure that when you stick your window on it's going to sit flush against the van body. Now you want to use some kind of tape that's not stretchy. This is going to hold your window in place. I'm just putting a couple of loops on the top of the van. Now, offer the window up, get it roughly in the right place. You just want to try and get the gap, top and bottom, to be about equal.
Then I'm going to go inside the van, and with a pencil, just follow the line of the edge trim. Now, this is really just so that I can take the window off again. And, it will give me my line for where I need to put my primer. I've used a little bit of the edge trim just so that I can gauge how far outside that line the actual adhesive is going to go. Then similar to what we did on the actual van body work, we're going to paint a continuous line of primer just outside our pencil line, leaving a gap for the trim, as you can see here. In theory, that's going to be where our adhesive is going to contact the window. By using our pencil line as a guide, it just means that we're not going to have any primer visible inside the vehicle, on the inside of the glass.
Now, your adhesive is going to come in one of these sealed canisters. First thing you've got to do when you're ready to load up your gun is pull the ring-pull on the back, pop that off, take out the little silicon cartridge. Then, with a screwdriver, you need to puncture that metal work on there. Then screw your nozzle on. Take the end off your mastic gun. Then simply drop the cartridge in, get the nozzle pointing the way you want, and then squeeze like that. Now, if you're doing this job in winter time, bring your glue cartridges indoors so that they can get up to room temperature. They'll be a lot easier to squeeze out of the mastic gun.
Now we're ready to start applying the adhesive to the van. On this side, I'm starting on the top right-hand corner, just below there, and working my way down keeping the nozzle right up against the plastic window trim. It just forms a nice perimeter of glue all the way around. When I get back to my starting point, I'm just going to feather outside my starting point. That will make sure we get a nice waterproof seal, so any water running down from the top isn't going to creep in. Because I'm doing two windows on this side, I'm doing the mastic body adhesive around both windows so that I can stick them both on at the same time and make sure they're perfectly aligned.
You simply offer the glass up like this to get it roughly in position. I'm not pressing down too hard at this stage. I'm just going to take my tape loops down to hold the glass in place. You want to aim for a uniform gap all the way around the window. Then I get both bits of glass on. Just do some minor adjustments and then start to press evenly and firmly all the way around to make sure the whole window gets in contact with the adhesive. The important bit is where the two bits of glass join in the middle. You want to get that a nice uniform gap. Same situation on the barn doors really. This time I'm starting in the top left corner, going around clockwise. Then when I come to my finishing point, I'm going to feather inside my starting point.
Now, I'm doing all of this with one tube of adhesive and I nearly get the second window finished, but at this point it runs out. As long as you've got another tube ready to go, you can simply take that one out and put the next one in. Then make sure your adhesive joins up with where it finished off. Now, this stuff is moisture curing, so the more humid the day the faster it's going to go. But it will still take five or 10 minutes before it skins over, so you've got a bit of time to get your glass up. Just make sure your gap is uniform and your top, and bottom, corners line up.
Once you've got your windows stuck on, it's best to leave them for a couple of hours to let the adhesive go off.
One final word, remember not to slam your doors before it has gone off, because it is possible to blow them back out again.
There you have it. That's how we recommend sticking bonded windows into your VW panel van. Now, in terms of time to do the job, I'm guessing it will probably take a couple of hours per window. I know when I was fitting windows for a living, I was able to glaze a whole van in a normal working day.
If you do have any more questions, please get in touch via the website or call us on 0113 804 2125. But I hope that's been of some use to you, and good luck with your campervan conversion project.
]]>
Welcome to our latest business update.
Brexit finally arrived....we knew we had to find a resolution to avoid many of our overseas customers receiving demands for tax on their purchases before they could receive them.
The new shipping process initially resulted in complications with invoicing, taxation, tarifs and administration fees for which our European friends were presented with an unexpected bill! This was not right and how we like to do business. So, in early January (with a heavy heart) we temporarily shut our EU stores whilst we found a new solution.
In March, after a great deal of work with our shipping partners, we managed to find a way to ship to France and Germany, minimising the extra administration fees and making the price on the website the final price for the customer. This has worked pretty well for us and our customers, but it was still leaving us at the mercy of local customs agents who could slow things down for some customers. We knew we wanted to give our European customer’s a better service than that, and we still had to find a solution for the rest of Europe.
In steps our knight in shining armour...OGOship. A fulfilment company distributing from The Netherlands, working on behalf of our stores to despatch products to our customers in Germany and France. Having this facility in Venlo, means faster deliveries, and no local customs checks between the warehouse and the customer. We are also hoping to open up the delivery network to the rest of the EU as soon as we can!

We are currently trialling two of our key campervan conversion products in our multi-warehousing system...our exclusive Kiravans VW T5/T6 Double Passenger Seat Swivel (LHD) and the Kiravans VW T5/T6 DoorStore are now being fulfilled by OGOship. So, if you order one or both of these items, and these items alone, your order will be dispatched from our Netherlands warehouse. All other items are still being distributed from our UK warehouse, but our aim is to ship 85% of our product range to our EU customers from The Netherlands before the end of the year.
We are in the process of establishing a completely independent trading business in The Netherlands to better serve our EU customers. We are totally focused on making things simple and hassle free for all of our customers near and far, as well as for our own internal processes.
Watch this space for more exciting news :)
Rob
PI8022, PI8023, MO9722, MO9222
Dear Customer,
We have recently been alerted to a product warning and voluntary recall issued by Dometic, relating to some gas hobs that we sell, and which are very commonly used in campervans worldwide. If you use a Dometic gas hob in your van, regardless of whether you purchased it from us, from someone else, or if it came with your van when you bought it, we thought you would want to know about this issue.
The product warning and voluntary recall is due to a fault they have discovered in the gas tubes and gas regulators which they believe can cause a potential leakage of gas, with the obvious associated dangers this brings. The current announcement is available here:
https://www.dometic.com/en-gb/outdoor/uk/lp/product-warning-and-recall
Dometic has also issued us with a letter outlining the issue in a little more detail, explaining that they are working on a solution and will inform us when they have an update. We will of course also advise you as soon as we have an update. You can read this letter here:
https://cdn.shopify.com/s/files/1/0273/3011/7685/files/Dometic_Cookers_-_Product_Recall.pdf?v=1627581951
At this point we can’t advise you any differently from the statement provided by Dometic that if you have one of the listed products, you should follow the instructions provided in the article, particularly with regard to shutting off the gas supply to your stove.
We are anticipating further detail from Dometic in due course. Our understanding is that Dometic plans to resolve this issue directly with the end user themselves and not through the retailers. We want to reassure you that if this changes we will work with Dometic to ensure that the issue is resolved as quickly as we can. Dometic is a large international company with a strong reputation to protect, so we see no reason why they wouldn’t work to resolve this issue as a priority.
While you are waiting to hear the full details of this recall, this would be a good time to look out the serial number of your product, so that you are prepared when more information is available. You can usually find the serial number on a label applied to the product. For the combi cooker & sink units the label is typically on the side-wall of your sink.
We do not have any additional information on this subject at this time, but we want to assure you that as soon as we have something useful to share with you, we will provide you with a full update and instructions on next steps.
Yours sincerely
Rob McC.

We’re well known for our extensive range of top branded products and exclusive ‘Designed by Kiravans’ campervan conversion products for VW T4 T5 and T6 vans, but did you know that we also sell a great range of conversion products for other vans including the Ford Transit, Ford Transit Custom and Vauxhall Vivaro?
If you answered no then don’t despair, we’re going to guide you through the product highlights of our Ford Transit and Vauxhall Vivaro campervan conversion parts.
We firmly believe that there are two tricks to spending quality time in your van and these are...comfort and speed. So we’re here to help and show you our Ford Transit and Vauxhall Vivaro campervan conversion parts and accessories that’ll simplify your van conversion and bring it to life, so you can enjoy spending time relaxing in your van.
Single swivels, double swivels, awnings, curtains, cab screens and loads more parts and accessories that will have your van adventure ready in no time at all...
First up is our collection of campervan seat swivel bases for Ford Transit, Ford Transit Custom and Vauxhall Vivaro vans. Ranging from single seat swivels to double seat swivel bases, we can cater for your needs.
Our extensive range includes the exclusive ‘Designed by Kiravans” Ford Transit 3rd Gen (2006-2013) Double Passenger Seat Swivel (Right Hand Drive), Transit Custom V362 (2013+) / Transit V363 (2014+) Single Seat Swivel RIB - Driver (Right Hand Drive) and Transit Custom V362 (2013+) / Transit V363 (2014+) Single Seat Swivel RIB - Passenger (Right Hand Drive), Kiravans Vivaro 2001-2014 Double Passenger Seat Swivel (Left Hand Drive) and the Kiravans Vivaro (2001-2014) Double Passenger Seat Swivel (Right Hand Drive).

There are many benefits to installing a seat swivel base in your van. Not only does it transform and open up the living area of a van giving more social space, you still retain the three belted front seats, so it’s both practical and really useful!
Double Swivel Seat Base Plate
Watch our quick video to see the double swivel base plate in action...
We have a great range of quality, bonded and tinted privacy glass windows for your Transit Custom and Vauxhall Vivaro campervan conversion. Options include both left and right front and rear windows, plus a choice of fixed or opening frames. Not only are they excellent value for money, they are also the perfect choice for adding style, privacy and that all important insulation to your campervan.
All of our windows are manufactured to CE and TUV safety standards and each design features the benefit of tempered safety glass for total peace of mind.
And don’t worry about your delivery either...all of our glass is insured and our bespoke box packaging is ultra sturdy and protective and designed for long distance transport. Breakages are rare but if any damages do occur, then we will happily send out a replacement under our ‘no quibbles guarantee’ policy.
Not only can we provide the windows, we also sell window fitting kits which contain everything you need to fit your bonded van windows. Contents include adhesive, primer, dabbers, surface and glass wipes and even a pair of disposable gloves. You can choose to have your kits bundled together with U-Profile window edge trim too, so you get a really professional finish. Our window fitting kits can be ordered individually or you can enter how many windows you plan to install and we’ll do the hard work for you and make sure you have everything to complete your window fitting with confidence.

We’ve got your van windows covered with our range of high quality Transit Custom 2013 - 2021 and Vivaro 2001 - 2014 Blackout Curtain Kits.
It’s fair to say that van windows weren’t designed to hang curtains, but with our curtain range you will achieve a professional finish in your van. We have used double-lined reversible fabric so you can choose between a black or grey finish in your van interior. The fabric is super stretchy with a fairly dense weave, giving very good light blocking and superb thermal properties. The curtain kits come with robust bevelled edge aluminium rails and are pre-drilled and pre-bent for each window location to make fitting nice and simple.


Kiravans Reversible Blackout Curtains
Take a sneak peek at our Kiravans curtain lifestyle video to catch a close look at the quality and fitting...
We also have a range of campervan silver screens for Transit Custom 2016+ and Vivaro 2014+ vans. Not only do they look great in your van, but cab window screens are brilliant at insulating and protecting the cabin from excessive sunlight, weather damage and dirt.
You can now store even more in your van with our exclusive ‘Designed by Kiravans’ Transit Custom DoorStore and PanelStore.

Storage in a van is always a challenge so we came up with a really simple solution to maximise storage quickly and easily.
Designed to fit straight into the redundant left sliding door cavities of our van, all you need to do is remove the factory fitted hardboard panels then pop in your DoorStore. You will gain loads more storage in a matter of minutes! It’s honestly that quick and easy to install!

The PanelStore is designed for the fixed right panel in your van so you can seriously supersize your van storage.
You just need to take out the factory fitted hardboard panel and secure your PanelStore into the empty cavities.
Once fitted, the Ford Transit Custom DoorStore and PanelStore gives you an incredible 12 extra storage bins!

Now watch our video to get a closer look at the DoorStore and PanelStore and see Mike fit them into a van. You really do have to see for yourself how quick and simple it really is :).
A campervan awning is a great way to extend your van living space and is also a really smart investment. Wind, rain or shine, it’ll make all the difference to the time you spend in your van. Knowing that you will have an extra protected area lets you enjoy your van in less certain weather conditions, and being able to assemble this very quickly makes life so much easier.
Kiravans Barn Door Campervan Awning for Trafic/Vivaro (Up to 2013)

This incredibly popular Rear Barn Door Awning is designed and manufactured exclusively for Kiravans and was the original one to hit the market.
Thoughtfully designed to include a very useful weatherproof rear shelter to replicate the job that an up-and-over tailgate does. It’s 100% waterproof, strong, secure and packs away neatly when not in use.
What’s even more impressive is that it can be installed in about 90 seconds...yes...you’ve heard correctly...only 90 seconds...it’s that quick and easy!
We hope you’ve found our Ford Transit and Vauxhall Vivaro campervan product highlights useful, but we have loads more campervan conversion products online too...insulation and carpet lining, tambour door kits, campervan table legs, fridges, sinks and cookers, lights and electrical components, taps, pumps, plumbing and bathroom fittings, portable toilets, van diesel heaters…. and so much more to discover!

With the UK likely set for another year of ‘staycations’ and lots of folk swapping holidays abroad for exploring our beautiful country, many camping, glamping and campervanning sites are already booking up fast.
The UK currently lacks the infrastructure for the many thousands of campervanners that hit the beauty spots, so where does that leave you if you’re desperate for a break? Wild camping in a rural spot without the luxuries of a campsite could just be the thing for you.
If you’re in the process of planning or converting your campervan conversion then you really need to think about how you will use your van...if you prefer the luxuries of a campsite then you don’t really need to worry about toilets and showers. But...if visiting off-grid, remote places is your thing, then making your van self sufficient could be the way to go. This means you can go on many adventures and enjoy your travels when facilities are lacking or in many cases non-existent.
So, with this in mind, we thought we’d take a look at the pros and cons of wild camping and whet your appetite for adventure with some really useful info…
Generally, in England, Wales and Northern Ireland you will need the landowner’s permission to stay there. However, wild camping in Scotland isn’t prohibited, including the incredible National Parks. Of course, there are some restrictions in areas around Loch Lomond. You can find out more on the Loch Lomond and Trossachs National Park website and Outdoor Access Guide to Scotland. There are also a few simple but important rules to follow which we have included a little later in this guide.
If you’re particularly interested in traveling the length and breadth of bonny wee Scotland then Cameron McNeish is your man...you can subscribe to his YouTube channel and there’s lots of really interesting information on there for you to explore.
Campervan overnight parking is notoriously difficult, but luckily there are loads of websites and apps to help make it easier. Many local communities (particularly in Scotland) are working together and in some cases crowdfunding to provide better facilities and parking - these are all welcomed and a change for good, and gives hope that campervanners will be welcomed in many more locations across the country!
The first thing to remember is that it is not allowed everywhere, so please never assume you can stay. Secondly, just because you can park somewhere doesn’t mean that you can stay the whole night.
There’s no guarantees, but….if you’re discreet, then it’s difficult to get into trouble. It’s always advisable to stay away from public paths and tourist spots, and if in doubt, always ask the landowner… usually landowners are very gracious and won’t mind, but you must always ask.
The rules on parking overnight are pretty unclear. There are no ‘official’ rules forbidding it necessarily and mainly it seems to be up to the jurisdiction of each local government and law enforcement, who tend to follow the unofficial rule of allowing it unless it is on private property. Therefore, stopping at a lay-by or in a public car park probably might not get you into any trouble, but setting up camp on private property or staying in the car park of a specific business could lead to you being asked to move unless you’ve agreed to it with the business owner.
The other thing to consider is using a campsite whenever available is the best way to minimise your impact on the environment and you’ll probably have a more restful night’s sleep :). But as we mentioned above, where this isn’t possible, just stay low profile by avoiding residential areas, honeypot overnight spots and other vans unless it’s a designated location. Some pubs and supermarkets allow overnight parking for customers, but check first.

Check out Brit Stops...we think this is a brilliant book that lists a load of free UK ‘pit-stops’ around the British Isles including country pubs, farm shops, vineyards, breweries, cafes/restaurants and even museums. These locations allow you to relax overnight and travel on the next morning having enjoyed some of the local produce.
There’s also a great app called Park4Night where you can find recommended parking spots so you can spend the night relaxing.
Now watch this quick video that the British Mountaineering Council recently made about van life and wild camping. Featuring pro climber Robbie Phillips who gives you a quick recap of wild van camping responsibly.
It’s fair to say that a van can give you the freedom to take to the road and enjoy the comforts of home anywhere you want. But please make sure your dream isn’t someone else’s nightmare! Please don’t forget that wherever you stay, just remember you are an ambassador for campervanning. We urge you to follow the wild camping etiquette...be considerate, and leave the place exactly as you found it, or perhaps even better :). Spend some money locally, even if you are camping for free, and please consider the local economy - shop locally, go to the bar, eat in a local restaurant. All these things really make a difference to local communities and as fellow campervanners we want to be welcomed with open arms wherever we choose to travel.

Most models come with a rotary or digital thermostat that can be fitted in a convenient location within your campervan so that you can set and adjust the temperature of the unit to regulate your van’s internal climate. Just like your central heating at home, some even have a timer so you can program the heater to come on when you really need it :)
Diesel heaters are a big investment, but if you want to be able to stay in your campervan all year round in comfort, you really can’t put a price on the convenience of instant heat… it makes the investment completely worth it!
We've put together a list of the most frequently asked questions we receive about campervan diesel heaters, which you may find useful for your conversion.
The first question you’ll probably ask yourself is…
The short answer is YES! A diesel heater is certainly one of the most practical ways to warm up a campervan and quickly. Simple to use, efficient, safe and most importantly will save you so much room and reduce weight in your campervan, because you’ll have a fuel line straight from the fuel tank rather than having to store bulky gas bottles.
In very simple terms, a campervan diesel heater is basically an air heater that works with a combustion and heating process. Within the heater’s combustion chamber is a heat exchanger coil and as the heater draws in fresh cool air via an inlet pipe, it simply passes over the heated coil and blows out warm air into your van. All exhaust gases are safely expelled through an exhaust system and released outside the van.
Modern diesel heaters are very safe to operate in a campervan. The waste gases used for the combustion process are safely piped and released to the outside of the van.
As with any appliance you use in your campervan, it is very important that you regularly maintain your diesel heater and we always recommend that this should be carried out by a qualified professional.
This solely depends on a number of things like the heater model, ambient temperature, and even the altitude can all affect the total fuel consumption per hour but typically you’ll be looking at 100ml per Kw.
Diesel heaters only use 12v power from your leisure battery to spark the initial combustion and then to drive the small recirculating fan while the heater is running. So electrical power consumption is very low and shouldn’t drain a well maintained battery.
Yes, a diesel heater will have a massive impact on condensation levels and will greatly help to reduce condensation in your van as it is only blowing in warm, dry air and recirculating it.
So, if you’re looking for a heating system for your camper conversion, then take a look at the MV Airo 2KW Diesel Heater. It’s a brilliant piece of kit and the only heater we sell because of this very reason. In our opinion, it is the best combination of performance and cost in a diesel heater for a van you’ll need. The MV Airo 2KW Diesel Heater is almost identical to an expensive Webasto Diesel Heater but with a lower cost of ownership, combined with it’s overall efficiency, it gets the thumbs up from us every time!
Although it requires a little more installation time, there are so many benefits that make the MV Airo Diesel Heater worth your time, hard earned money and energy:
And to make it easier, we sell the complete diesel heater installation kit, ready to fit inside or underneath your campervan. It’s possible you’ll have seen cheaper models on ebay - just be aware that they don’t include all the bits and pieces you’ll need to actually install the heater, so it can also be a real faff for you to find all the other components you’ll need. We supply it all so you don’t need to worry.
Now it’s time to put your feet up and watch our latest video of Mike unboxing and explaining how an MV Airo diesel heater works… he’ll help you to understand the ‘why, what and how’ of this type of heater. Happy watching :)
If you’d like to see more of our ‘How to’ campervan conversion videos, pop over to the blog section on our website or subscribe to our YouTube channel.

A van DoorStore is an innovative solution for increasing the storage in the back of a panel van. Much like the storage bins you get in the front doors of your car or van, the Kiravans DoorStore fits neatly into the empty cavities of the sliding door and has a variety of storage pockets for keeping all those little bits and pieces you need, nice and secure, when you’re out on the road.
Like most of these things, ideas tend to arrive as you are sat in the back of a van pondering conversion options. Back in 2013, Rob spotted the big empty space behind the lining panel in his VW T5 sliding door and got his tape measure out…

Having figured out that the concept was a goer, we got in touch with an automotive designer on Upwork. He produced a concept sketch to bring our idea to life, which we then emailed to a plastic forming company in Derbyshire.
We now had enough information to know that we should go for it! Not knowing whether anyone would actually buy a product like this or not, we decided we had to take the gamble…
Having learned all about the different plastic types, colours and finishes, we were now ready to commission the mould and place an order for our first twenty DoorStores. Initially, we ran into a few teething problems with the lower pocket rubbing on the T5 wheel arch when the door was opened. So, inevitably there was a bit of tweaking to be done before we had the final product ready for market.

I had installed the prototype in my van by now and was finding the extra space really useful so we were fairly confident our customers would love it too :)
As word spread and orders increased we boosted our production batches up to 100 units. We started to get lots of positive feedback and videos emerged of people lining and personalising their Kiravans DoorStore in many individual styles.
We expanded our range to include a product for a right hand sliding door, which opened up a whole new European audience. Shortly after came a design for the twin rear doors. Sales kept building steadily and we got distracted with other projects as the company grew.

We are constantly inundated with requests for DoorStores for other van models, so to satisfy this we started doing our research. Unfortunately, not all vans had such useful space in the door cavities as the VW, which ruled out certain makes.
However, the Ford Transit Custom was one we really wanted to develop due to demand. Unlike VW, Ford seemed to have a number of different models of sliding doors for this van so we just had to pick the layout that would offer the best storage options.
Our product designer worked hard during lockdown to come up with two awesome products, which has just recently been produced and released to market. Time will tell whether the Transit Custom DoorStore and Transit Customer PanelStore join our bestsellers list too!

With an ever growing variety of panel vans being manufactured and converted we will continue to expand our DoorStore product line. If you have a van that you think would work well, feel free to get in touch and share your idea.
Watch our videos that bring our VW and Transit Custom DoorStore's to life...
If you want to find out more about Kiravans and our campervan product innovations, then read all about the first product development story on the following link for our legendary Double Seat Swivel Base for the VW T5.
It’s funny how a simple idea can take off sometimes…
Mike McC.
Director
First up, you need to be using the correct products - and this is where I always rely on a British company called Bilt Hamber. These guys really know their stuff and have been consistently producing award winning car care products for years. I discovered them back in 2016 and have been singing their praises ever since. Their products are effective, environmentally friendly and concentrated, so a little goes a long way.
Buying, converting and owning a van can be a fairly expensive pastime so it’s always worth looking after your investment. Here is my ‘go to’ van care regime, which makes the most out of your time and your money.

The following four steps describe my ‘regular wash’ routine. It takes about 40 minutes and I aim to do it every couple of weeks on average.
1. ALLOY WHEELS
The first step is to spray the alloys with Auto-wheel. This is a mythical solution that comes out colourless and quickly turns deep red as it works its magic.

Here’s a bit of particle science - every time you hit the brakes whilst driving, you are effectively shedding lots of hot, microscopic shards of brake dust and metal, which fly off and become embedded in the lacquered surface of your alloy wheels. Over time this builds up into that familiar dark staining that becomes harder and harder to shift.
Auto-wheel’s formulation reacts with the oxidising surface of these metallic particles, rendering it water soluble. The rapid removal of this microscopically rusted surface reduces the embedded particle size and releases the particles from the surface. Unlike acid based alloy wheel cleaners, this method is harmless to the wheel’s finish.
In the time it takes me to spray all four wheels, the first wheel is ready to be rinsed with the power washer. It’s that quick and simple - oh and I give under the wheel arches a blast at the same time.
2. PREWASH
Probably the most overlooked, yet most important stage in car cleaning is the ‘hands off’ prewash. If you go straight at your dirty van with a sponge and soapy water you are effectively grinding whatever muck is on the surface into the paintwork and causing thousands of tiny scratches in the clear lacquer layer. It doesn’t take many of these washes before you’ve lost that smooth ‘easy to clean’ top layer and resigned yourself to duller paintwork and tougher cleaning for years ahead.
To avoid this, I always recommend investing in a pressure washer and a ‘Snow Foam’ lance attachment. It may seem like an expensive outlay but a decent one will last for years and save you time and money in the long run.
Bilt Hamber Auto-foam is a pre wash solution that turns into a foam when diluted and sprayed via a pressure washer. Spray it all over your van and allow it to ‘dwell’ for five minutes or so. This will break down any road traffic film, grease, mud and other gubbins that is stuck to your paintwork. Next, power rinse the whole van and you’ll be surprised how clean it looks already! So far you have probably removed 90% of the dirt from your van without laying a finger on it.

You’re not done yet though. Fill a large bucket with warm water and add a tiny amount of Auto-wash vehicle shampoo. The manufacturer recommends about 5ml, which shows you how far this stuff will go. Now go ahead and wash your van in the traditional way using a good quality ‘wash mitt’. Start up high and work your way down. You may want to have a separate mitt for doing dirtier areas like wheels and sills.

Power rinse the whole vehicle again and give it a quick dry off with a large, good quality drying towel to prevent water marks. Your van should now be looking spectacular. However, if you want to take it to the next level… read on.
OK, so from here on I’m describing a process that you probably only need to do a few times a year depending on how many miles your van does and under what conditions. But I would say that decontaminating and protecting the paintwork makes your regular van washes a whole lot quicker and easier.
1. CLAY BAR
I must say I was slightly baffled when I first heard about ‘claying your car’… it sounded a bit counter intuitive, as though it might scratch the paint rather than improve it. However, having gone through the process a few times now, I can confirm it really works!
So, back to our particle science… similar to the tiny metal fragments embedding themselves into your alloy wheels, the same thing happens to the van paintwork. As we drive around, microscopic contaminants are constantly bombarding the bodywork and turning the smooth factory clear-coat layer into a rough surface. You can actually feel it just by lightly running your hand over the bonnet for example.
Bilt Hamber’s Clay-bar is a malleable square of clay that you rub lightly over your van and it ‘grabs’ all the contaminants out of the paint, resulting in a super smooth finish. In practice you would cut off a chunk of the bar, flatten it into a sort of pad and then use a water spray bottle to lubricate the ‘claying’ action. Working in small sections at a time, it’s not the quickest process in the world but you can see the clay discolouring as it does its job. It’s easy to feel the difference before and after.
Now to protect your beautifully smooth paintwork.
OK, let's start with the basics. There is ‘polish’ and there is ‘wax’ and they are not the same thing. The act of polishing means to use a super fine abrasive liquid to rub away a little of the surface layer in order to reduce blemishes. Whereas the act of ‘waxing’ means to apply a protective coating over your vehicle paintwork to protect it from the elements and make it look nice and glossy.
I’m not going to talk about polishing as that is more for owners of older vans and those who want to get more into vehicle ‘detailing’.
When it comes to wax, there are plenty out there to choose from, but for me the Double-speed Wax provides a great balance of glossy finish, lasting protection, speed of application and cost. It contains natural Carnauba wax, goes on quickly and buffs off easily.
And that’s it! My ‘quick and easy’ van care routine.

In an ideal world I’d probably do a ‘regular wash’ on my van every couple of weeks and a ‘clay bar and wax’ about twice a year. However, life gets in the way quite often so sometimes it doesn’t happen like that…
One of the biggest benefits I’ve discovered though is that by going through the process described above, each van wash becomes remarkably quick and easy. The dirt just doesn’t seem to stick so much when the paintwork is smooth and protected. So the whole thing becomes less of a chore, which means more time away in your van building adventures!
Happy van cleaning :)
Mike McCandless
In today’s spotlight, we want to show you how easy it is for you to install a Kiravans VW T5 privacy window in 9 simple steps. We’ve also got a really useful ‘How to’ installation video for you to watch later on, where Mike shows you exactly how to prepare and fit your van window and gives you some really useful hints and tips along the way.
It’s really important that you carefully unbox and check your windows before you cut any holes in your van!
To do this you’ll need to take off the protective plastic wrapping then get some window cleaning agent and give them a good clean on both sides. This will enable you to give them a thorough check and make sure there are no defects before you fit your glass. If there are any spots of adhesive on the glass this can be easily removed with a degreasing agent.

Use a sheet of polythene and some masking tape to protect your paintwork below where the window will be fitted. Then around the edges of where you will cut out your window openings, use a double layer of masking tape to be cautious and ensure that no exposed paintwork can get scratched in the process.

First of all check both sides of the panel that you will be removing to make sure you’re not going to cut through any pipes or wires.
Inside the van, you’ll need to mark a straight line across the top and bottom of the central strut, take your mini grinder and cut out the top and bottom section of the strut.

Mark a dot in the four corners of the metal panel (about 10mm in from each corner) and drill a hole through the panel from inside the van to outside. Then go outside the van and with a permanent marker pen and straight edge, mark a line from dot to dot. The joined lines will mark the rectangle for using the jigsaw to cut out the bulk of the metal panel.


Now’s the time to get your goggles, gloves and ear defenders on!
Place your glass suction pad in the middle of the metal panel to stop it from falling and causing any damage when you cut along the marked lines. Cut each straight line but stop about 5mm short of each drilled hole so that the panel corners remain secure at this stage. It can get tricky cutting round the corners, but as you do cut carefully through the holes you’ll be able to stop the panel from falling by using the glass suction pad.

Once the panel has been removed you’ll be left with an inch or two of metal remaining all the way round. This needs to be removed either with an angle grinder, metal cutting power shears or a jigsaw, keep checking inside the van and follow the line of the inner skin of metal. Once you have finished cutting your window opening, take off any high spots with a mini grinder and give it a light rub down with some sandpaper.
The following two photos show a way in which you may find it easier to cut the corners if you’re using a jigsaw.

Next thing we've got to do is rust proof that metal window edge so that it doesn't start to corrode. Primer with a dabber is a great way to seal it all in and make sure that no corrosion is going to occur.

Then it’s time to add the knock on edge trim. Choose a thick window trim which avoids you having to cut out the rubber pinch wells between the two metal skins.

Now we're ready to start prepping the van for bonding. It is important to remove any dirt, polish or residue to get a good bond.
Use a degreasing agent all the way round the paintwork where the primer is going.
Get your primer and apply it to the bonding area, following the line of the knock on trim. Apply one clean application of primer rather than multiple layers to ensure a clean, even bed of primer for the adhesive.
Add an extra arc of primer (above the existing line of primer) in the top corner where the adhesive is going to overlap to create a waterproof seal.

Next, we are going to use the glass activator and give that a decent wipe all the way around on the ceramic band of the window. The activator solution will enhance the bonding surface of the window and help to activate the adhesive on contact.

Now is a really good time to dry fit your windows to make sure there are no high spots in the framework, which may affect the flush fit of the window.

If there are any raised spots then simply tap the bodywork with a rubber mallet to make sure it’s flat.

Prepare to fix your window in place by attaching a couple of loops of ‘non-stretchy’ tape to the top of the van. The idea is that the tape will hold your window in place whilst the adhesive sets.
Offer your window up to the van and get it roughly in place. You want to try and get the gap top and bottom of the window to be about equal. Also if you are fitting two windows side by side you need the gap between each window to be as equal as possible.

Go back inside the van, take a pencil and draw a line around the inside of the window opening onto the back of the window. When you remove the window the line will show you where to apply your primer.

Then take a piece of spare edge trim and place it on your frame so that you can gauge how far outside the line your adhesive needs to go.

Paint a continuous line of primer just outside the pencil line, leaving the gap for the window trim. Using the pencil line as a guide means you won’t have any visible primer on show inside your van or on your glass.

Next, load up your mastic gun so that you can start bonding your window in place. Mike shows you how to do this in our window fitting video but let’s crack on with the main job in hand...fixing the window in place.
If you’re doing the job in colder months then a valuable tip is to get your glue cartridge up to room temperature so it’s easier to squeeze out of the mastic gun.
It’s time to start applying a continuous bead of adhesive to the van. Keep the adhesive nozzle right up against the knock-on window trim.


Offer up the window and make sure it’s aligned as best you can.
You can use the tape loops to loosely secure the window whilst you’re aligning it to keep it in place. Aim for a uniform gap all the way around the window.
Once you’re happy with the position, start to press evenly and firmly all the way around the window to make sure the whole window gets in contact with the adhesive.

Please be careful not to slam the van doors whilst the adhesive sets as this could blow the windows out :(
Once the windows are in place, pop the kettle on and leave them for a couple of hours whilst the adhesive sets...
Congratulations, you’ve done it! You’ve successfully fitted your campervan windows and now you can drive away and enjoy the views :)


Now watch our useful installation video - ‘How to Fit Van Windows into a VW T6 SWB’ to see Mike in action.
We have a great selection of products suitable for all of your window fitting needs on your VW T5/T6, Trafic/Vivaro and Ford Transit Van conversion including tools, window trim, bonded tinted privacy windows and really useful window fitting kits that have everything you need to do the job properly.

We’re really excited to introduce you to our brand spanking new ‘Designed by Kiravans’ Ford Transit Custom RHD DoorStore and PanelStore!
Our new products have been thoughtfully created for…
Storage is always one of the biggest challenges for van owners and we can offer you a simple solution to quickly and easily enhance your storage power.
When travelling, you’re really not going to want clutter everywhere you look...you’ve gone away to relax after all! And, keeping your work van in order is equally as important so you can be more organised and efficient during your working day.
Extra storage will definitely benefit you in the long term and allow you to pack big in a small space.
Our new DoorStore design originated from our bestselling VW T5/T6 DoorStore. We simply were inundated with requests for us to extend our range and create one that would fit the Transit Custom, so it was a no-brainer for us. It’s really this straightforward, and we do plan to keep extending our range of DoorStores to fit more van types.
The real beauty of a Kiravans DoorStore is that it fits straight into the redundant sliding door cavities..simply remove the factory fitted hardboard panel, pop in your DoorStore and you will gain loads more storage in a matter of minutes! Honestly, it’s that quick and easy to install!
Take a look at our video a little further down where you will get a closer look at the product and you can watch Mike install it first hand.

Exactly the same concept as the DoorStore but designed for the opposite static panel so you can seriously supersize your van storage.
Just remove the factory fitted hardboard panel and secure your PanelStore into the empty cavities. So simple yet so effective!
Combined, the Ford Transit Custom DoorStore and PanelStore give you an incredible 12 extra storage bins! You really can’t go wrong with this brilliant van storage!

We know from experience with our existing DoorStore range just how useful these products are. We’re sure you won’t be disappointed :)
So...sit back, relax and enjoy our Ford Transit Custom DoorStore and Ford Transit Custom PanelStore video where Mike introduces you to our new products and demonstrates just how speedy and uncomplicated they are to install.
Do you have any good campervan storage ideas? Share them with us, we’d really love to hear from you.
]]>
Our new Ford Transit Custom DoorStore & PanelStore design originated from our bestselling VW T5/T6 DoorStore. We simply were inundated with requests for us to extend our range and create one that would fit the Transit Custom, so it was a no-brainer for us. It’s really this straightforward, and we do plan to keep extending our range of DoorStores to fit more van types.
So...sit back, relax and enjoy our Ford Transit Custom DoorStore and Ford Transit Custom PanelStore video where Mike introduces you to our new products and demonstrates just how speedy and uncomplicated they are to install.
https://www.kiravans.co.uk/collections/kiravans-door-store
]]>
If you're not sure which campervan porta potti you need, check out our latest video where Mike takes a closer look at our cheeky little range of campervan toilets 🙌 😀
]]>
Watch our latest time lapse of a VW T5 Kombi van conversion...from grubby work van to a sound proofed, insulated, carpeted leisure van complete with new side windows.
]]>
Our Blackout Cab Divider curtain kit is a quick and easy way to give you some privacy and darkness to the back of your van and a great alternative to silver screens and cab curtains. The Cab Divider curtain kit is very straight forward to fit and quickly and effectively partitions off the cab area from the living area of your camper.
You can find our kits here: https://www.kiravans.co.uk/collections/t5-short-wheel-base-curtains/products/vw-t5-t6-cab-divider
]]>
We were still a small start-up back in 2008, with only myself and Rob working in the business. Turnover was modest and I was spending my time installing van windows, while Rob focussed on growing our online van window sales.

I had converted a few VW vans by this point and had gone through the process of removing the double passenger seat in order to fit a single, swivelling version. It struck me as being a waste of money, and losing that third seat up front just seemed crazy. I had mentally ruled out the option of swivelling a double passenger seat due to the width of it and the apparent lack of space. However, luckily my dad was over from Ireland visiting around that time and he put his engineering mind to it. Before I knew it we had the tools out and were creating mock-up swivels out of plywood.
After a day or two it became apparent that by creating a ‘turn and slide’ mechanism it may just about be possible to rotate the seat. We were both pleasantly surprised and Dad headed back to Ireland with some sketches and an idea to get a prototype made up by his local metal worker. Neither of us thought too much about it and over the next few months there was a bit of making, testing and tweaking. Eventually, we came up with a working model and decided that if we were to start selling them we would have to invest in a pull-test to make sure the product was safe.
We booked our slot at the STATUS lab up in Manchester and watched nervously as the machine tried to wrench the double seat and swivel out of the floor. To our relief it held firm and we left clutching our ‘PASS’ certificate. Next stop was the metal work factory to order our first batch of twenty. This was a big deal, and a sizeable investment for us back then. We didn’t know if we could even sell one of these let alone twenty!

I can’t really remember how quickly they sold but I’m guessing it took a few months and then we had to start ramping up production as word spread and demand grew. From that moment on it seemed like every month we were ordering more and more, and always struggling to keep enough stock on the shelves. Luckily, we had the foresight to get the design protected at prototype stage as we were now seeing copycat versions appearing. We had to employ a lawyer to fend off a few direct copies as we tried to grow our brand.
Although the product was proving successful, we never rested on our laurels and we continued to grow the rest of the business at the same time. We were fortunate that our campervan Double Seat Swivel was generating enough cash for us to keep expanding the rest of the product range. Looking back, I’m not sure Kiravans could have been the success it is today without the Double Swivel giving us a leg up.
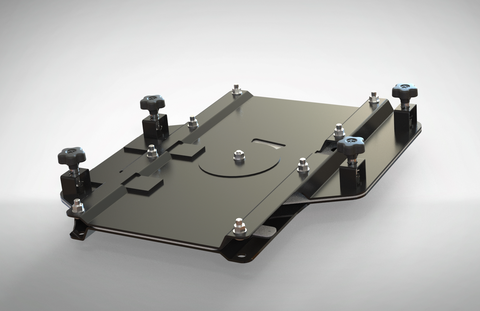
As I write this, it is twelve years since dad and I came up with the initial design and we have now sold over ten thousand units worldwide. Our skills, coupled with Rob’s e-commerce knowledge and entrepreneurial flair have proved to be a successful family formula. We have been supported by legions of lovely customers, who provide invaluable feedback. Our loyal trade customers have helped to make the Kiravans Double Swivel the industry standard. As sales have increased, so has our workforce. We are now able to provide employment to around 15 staff in our Keighley head office and countless others through manufacturing, design and fulfilment contracts.
It’s funny how a simple idea can take off sometimes…
Mike McC.
Director
Transform your campervan living and dining space with our game changing double seat swivel base. Designed in-house, our exclusive design-protected Kiravans VW T5/T6 double swivel seat system really is an amazing product that will transform your living and dining space in your campervan. Clever engineering sees the seat released from its base, allowing it to slide, swivel and face the rear...very simple and extremely effective creating a comfortable and practical living space. It’s also designed for left and right hand drive so perfect for UK and European vans.
]]>Our latest video gives you an introduction on how to wire LED lights in your campervan.
]]>
VW T5/T6 Campervan Swivel Seat Base & Safe
]]>
Take a closer look at our VW T5/T6 campervan cab mats. Awarded with 5 star customer ratings, our cab mats are a quick, simple and luxurious upgrade for your van.
]]>